Thursday, January 26, 2012

Winter Word Study

Now that D is reading quite well, we moved into Word Study.  Currently we are focussing on Syllable Counting and Compound Words.  We already covered a few basics while we were going through All About Spelling Level 1, so this work is not new to D.

As part of identifying syllables in words, I put together a few words that were winter themed. D will need to identify and sort 1, 2, 3, 4 and 5 syllable words.  I don't have pictures of the tray, but you can download this here.


Once she is able to easily sort these, we will move on to breaking up each word into its individual syllables.  The plan is to provide a bunch of toothpicks and D will use those to break it into its individual syllables.


For Compound Word study, I created these penguin themed Compound Word cards, that D will match.
You can download that set here.  As always these are for your personal use only and if you share it, please link back to this blog!

Tuesday, January 24, 2012

Antarctica Report

After our unit on Antarctica, I asked D to illustrate and write about any one thing that she wants from our unit on Antarctica.  This is her creation!

Scientist inside snow cave!

I love how she has layered her scientist (Sientest!) with all the warm clothes, boots and eye glasses!  This is now saved and is part of the Antarctica box!

Sunday, January 22, 2012

New Math Works

Last week we've had awesome progress with D in Math.  In fact I was not that prepared, but somehow managed to pull through and put together trays for her!


We started off by learning to tell time.  We've had not done formal Montessori lessons on telling time, but D knows the basics from some of the books we read.  I had originally bought a "Classroom Scheduler" thing from Target last September.  At that time I wasn't sure how I was going to use it.  So, I used that and cut out the clocks and set it up so that D can learn to tell time to the hour.

She caught on quickly and then proceeded to learn to tell time to half past, quarter past and quarter to.  She was also very curious to know how to tell time at 5 min intervals.  Since she already knew how to skip count by 5s, I put together this tray quickly, using the pumpkin picks I already had.


Till now we've been skip counting by 2s, 5s and 10s, but have never used bead chains.  I recently bought the short bead chains, so again, we did an impromptu lesson on bead chains for 10s and 5s.


I need to print out the proper colored arrows and set this up properly for her, so she can continue to skip count the various numbers.

She then started counting and wanted to do the hundred board and proceeded to finish that too!


This is another home-made material I made using a piece of card stock for the board.  I drew grid lines 1 inch apart using a marker.  I have some foam stuck on this card stock as a border and re-inforced using duct tape.  For the number tiles, I used 1 inch decorative glass tiles that I purchased from Lowe's and wrote the numbers with a permanent marker.  These tiles have a nice solid feel to them and they do not move!

As you've probably noticed from my previous week's post that we've also moved away from the concrete golden bead materials and into the stamp game.  Since I do not have the stamp game I've used the RightStart Material Base-ten cards.  We were at the point were D was feeling that the golden beads were a little too cumbersome to work with, so I introduced this and so far D is comfortable using these cards for addition, subtraction and multiplication, both static and dynamic.

I was glad that D was on a roll last week and did so much! I love to "follow the child" at these times! (wink *)  We are going to be on a 2 1/2 month vacation starting Feb, visiting family abroad, so any work that gets done this month is awesome!

Friday, January 20, 2012

Super Snow

If you live in the Mid-west, winter this year has been blessed with such warm weather! It feels like spring actually.  But the kids sure miss winter! D's favorite season is winter and this year has been such a disappointment for her.  Also how can you do an Antarctic Unit without playing with snow?!!

I found this product called "Super Snow" at one of the teacher supplies store.  So we decided to make our own snow.  I greeted D with this set up one day.


The process is simple, you just measure one teaspoon of this product and mix it with 4 oz of water.


Stir and stir and stir....

Here is some snow!

We made a larger batch later and D had a blast.  I am keeping this away from M as she tends to taste whatever she plays with.  I never knew about this product till date, am I the only one?

Wednesday, January 18, 2012

DIY Sound Cylinders

I wanted to share some of the DIY materials from our homeschool.  As you all already know Montessori Materials are expensive and lets face it, buying all the materials for home use, where only one or two children use it seems like a terrible expense, especially in single income households.  While some sensorial materials are extremely difficult to make like the knobbed cylinders, some are extremely easy to put together using simple household objects.  One such material is the Sound Cylinders.  If we were to buy this online, it would cost us anywhere from $20 for a reasonable quality one to $75 for a premium quality.  The cost for making this using items from the house, $0!


Here is what you need:
  1. 12 Opaque containers, if you are making six pairs.  I re-used chocolate pudding containers and made only 4 pairs, oh well!  I've seen a variety of other containers throughout the blog world, from painted glass bottles to the toilet paper tubes.
  2. One sheet of red and blue card stock.
  3. Tape.
  4. Items for filling the bottles.  I used - large rocks, small rocks, rice and paper.
  5. Stickers for marking the pairs

Once you have the above items, fill each item in two containers measuring out approximately the same quantity.  Shake them slightly to make sure they make similar sounds.  Cut one piece of red and one piece of blue cardstock to cover the mouth of the container and tape it shut.  Repeat this for the remaining items and you are done!  Easy peasy!


Tuesday, January 17, 2012

Iceberg Painting

Last Friday, we decided to be artists in Antarctica and paint an Iceberg using salt and paint! 


Here are two views of the finished product!


After we were done, we put our iceberg out in the snow!


I saw this activity here.  It might be a cool thing to do in the summer, but I thought D would enjoy it as part of our Antarctic Unit.  I was right, she spent a good amount of time on this activity and we even got to discuss some details of salt, ice and melting point!

Monday, January 16, 2012

Our week

Lots of Math....


Tons of reading....


In addition to Antarctica study, world puzzle...


Sensorial Explosion...


This post is linked to Montessori Monday.

Thursday, January 12, 2012

Our Continent Boxes - Antarctica


This post is about our Antarctica Continent Box and its contents.  In my previous post in the Continent Series about our North America Box, I had posted about the kind of box I used.  Since the Montessori color for Antarctic is White, this box was perfect!  The front of the box has some White glitter scrapbook paper.  We also cut out some Antarctica animals and decorated the box with those.  All the pouches for the cards were made using scrapbook paper.  Nothing fancy, just a container to hold to the cards.


While deciding the contents of the box I had to keep D's interests in mind.  She is at the sensitive period for details on things.  So if I included pictures of whales in the box, then I better have details on each whale, how one differs from the other and so on.  I learnt so much while creating materials for this box!  Now I am well equipped to answer most of D's questions!

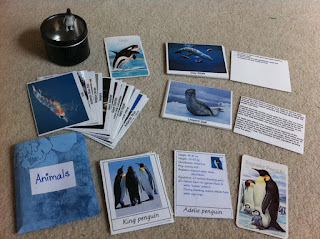
There are two major areas of focus on the materials - Animals and Scientists.  Here are our animal cards.


Here the focus is mainly on Penguins, Seals and Whales.  I also included a bunch of birds and crustaceans that are related to the food chain Antarctica. The Penguin cards are from here.  I made the rest using Google and Wikipedia. When I searched through our collection of Toob Animals, I realized that we did not have the Penguins or Ocean Animals Toob.  Our local Michaels did not have it either! So  for now we just have one penguin and one seal figurine!


From here, I got this interesting book called "Who's Eating Who?" that is a lovely read for my 5 year old.  It discusses a lot of details and gives an insight into the Food chain in Antarctica. I put the pages in a folder enclosing them in page protectors.


From here (made by Honey @ http://mondorfment.blogspot.com) I got this wonderful printout of an Emperor Penguin's lifecycle.  D loves "March of the penguins" and so these cards are perfect for her.


I printed out a map of Antarctica and some interesting pictures showing the South Pole, Ice bergs, Cruise ships, etc.


For information on Scientists I made this booklet from this website.  I got the idea from here.


As an add on to this book and to provide some activities for D, I made this paper doll with the different scientist clothing.  It has all the layers a scientist would wear in Antarctica. I got the images from here, colored and laminated the pieces.


D loves cars and enjoyed these Antarctica transportation cards that I made for her.  I got the details from here.


I have the map and the paper doll stored in a folder like this.


I made got this post card and stamps from Google.


I also created a few Artwork done in the Antarctica theme.  D especially loves the "Ship stuck on Ice" one!


No study of Antarctica would be complete without some info on Snow.  Here is a snowflake that we used during this art project we did.  The drawing of Snowflakes was done by D and added to the box! I made this easy reader booklet for her with some information on Snowflakes, how it is formed and its types.


For the books that we used for this study refer to this post.

I have a series of activities planned and I will post about those as we get them done.  We might add those to the box too.  Hope you enjoyed looking through our Antarctica Continent Box.  To take a peek at the other boxes, click here.