Sunday, November 27, 2011

Our week

Hope everybody had a wonderful thanksgiving weekend! We had a great time sharing feasts with friends and family.  I am personally thankful to my wonderful husband and all that he does for us.  He has taken upon the full responsibility of providing for us, because of which I get to do what I want to do most, raising our beautiful daughters.

Last week was short, but a very productive week at our homeschool.  Here are some pictures of D in action.  D completed a big work last week, Reading Folders sort.  


Here she is checking her work using the control of error on the back of the phonogram cards.


In the next few shots, D is working on the cylinder blocks, monomial and binomial cubes.


Here she is working on the Writing Exercise I posted about earlier.


We've been working with Nouns and Articles in our grammar farm.


In Math, we worked on addition with carry over and subtraction with exchange using golden beads and D loved it.  Here is a picture of few of her completed problems.


She also worked on some sewing and here is her finished product.


We worked on a lot more, but I don't have pictures of everything.  All in all it was an awesome productive week!

I am linking this post to Montessori Monday.

Monday, November 21, 2011

Language/Reading update and free download

D has been going over all the reading folders and mini booklets that I made for her and now has almost mastered all of the phonogram variations. D has never been reading enthusiastically by herself up until we finished the reading folder work. The texts in most of the early reader books that she read never interested her. The problem with some of the other reader series that we could get at our library in the topics that were of interest to her were too advanced for her. Now that she has completed the reading folder work she can refer to her phonogram dictionary and read with ease!


So she has been reading through the level 1 and level 2 readers in the Real Kids Readers series, Robin Hill School readers and The Cat in the Hat readers from the library the past few weeks. I check out around ten to twelve readers at a time each week from these series and I have a basket set up for her. Now all she wants to do all day is to keep reading! I noticed that she keeps coming back to each reader several times till she masters reading the text fluently.


After she finished all the reading folders we celebrated and I presented the phonogram dictionary to her as a gift! She is getting used to it and getting the hang of looking up the spelling variations by herself instead of just asking me whenever she encounters a variation she can't remember!

Guess who else is in love with the phonogram dictionary? You are right, my one year old loves to snatch it from her sister and make a run to the nearest corner to tear it up or to decorate it with a stray marker! So for now the dictionary is restricted to our school room and I have this alternate set up on our living room high above M's reach.


As you can see, this has all the Reading Folder variations and one example for each phonogram. This works perfectly when D is reading in our living room where we hang out most of the day. I often catch D looking at this during times when she is not reading and simply go through the sounds and example words!

Speaking of Phonogram Dictionary a few of you had asked about it after my previous posts on the Dwyer series. Luckily for me, Ms. Barbara Furst sent me her extra copy!  Then she sent me another copy to make available to my readers! So here you can download the dictionary!  I also have all the downloads in the downloads page, which you can access by clicking on the "Downloads" menu item above.  The variations are grouped into four dictionaries.  Here is a picture of how the completed ones look like.


We are very excited with this new stage in reading and are moving forward with classified definitions, word study and the function of words! I will post about these as we progress through!

I am linking this post to Montessori Monday.

Sunday, November 20, 2011

Exercise in writing

I don't know if I posted before that D has been going crazy writing for a while now (read: sensitive period!). It started off with just doodling when she was younger, then trying to form numbers and alphabets to writing and labeling using single words and now writing stories, recipes and lists!

We never had an issue with the proper formation of letters and numbers, thanks to the Montessori sandpaper letters and numbers! We don't own the fancy wooden ones (read: expensive!). I made ours using card stock and very fine sandpaper. Since this was one of the first materials I made I did not make them in the traditional montessori colors, I just used what I had on hand. I don't think D had a problem, it served its purpose and has held up good for our home use.


We've also been doing "dictation" as part of our All About Spelling program twice or thrice a week. We do 5-7 words in one sitting and are done with level 1. Here is a sample from our most recent dictation page.


As you can see we need to improve on staying within the lines and spacing between the words.

We've tried different tracing worksheets, but D still didn't seem to get it. Here is an exercise from Gettman that I put together quickly for D to understand where to begin and end each letter within the lines.

(Sorry for the horrible lighting)

I simply drew these lines on a piece of card stock taking rough measurements from our moveable alphabets. I have one letter of each alphabet in a bowl and D basically places all little letters (a, c, etc.) between the dotted lines and the blue line, the tall letters (h,t, etc.) between the red line and the blue line and the ones with tails (g, j, etc.) between the dotted lines and the solid blue line with their tails hanging down.


For control of error I have a card that I cut out from one of the tracing books we had.

(Ok, I just realized as I was posting this that in the handwriting sheet that I made I have the blue and the red lines upside down.  Good that I noticed, now I am going to add a dot or punch a hole to indicate which edge goes on top!)

Hopefully this should help with one of our problems. For spacing issues we are working leaving one finger space between the words. Do you have any suggestions for this?

I am linking this post up to Montessori Monday and TGIF Linky Party.

Wednesday, November 16, 2011

Cultural Exchange - Mexico 2

Here is another installment of a package we received in the Cultural Exchange we participated.  As I have mentioned earlier we were part of two 6 people groups and this is another package from Mexico that we received.  

First is a letter that we received from the family.  A recipe and some picture cards that can be used for some games or to learn simple Spanish words.


Some wonderful pictures of people from Mexico.


Flag, Currency, tiny maraca, tiny bowl and tiny footwear.


Map of Mexico, some candies and lemon salt.  Also included was a coloring page with Mexican costumes.


A red chili pinata, foam Mexican shapes, corn husk and a paper Mexican doll.


Coloring page of a Mayan pyramid, finger puppets of butterflies to color and some wooden beads for stringing.


The blue item is a lovely Mexican design that can be used as a stencil.  On the other sheet is a set of instructions to parents for all the wonderful crafts included in the package.


Two crafts, making the God's eye and a cute flower mask.


Some facts about Mexico and the significance of the flag.


This was a wonderful package and I was amazed at the number of items included in the package.  I used a lot of items from this package to fill our North America Continent Box.  If only my Box were bigger, I would used all the items from this package!

To see more of our cultural exchange packages, visit here.

Monday, November 14, 2011

Spindle Box Repurposed

I always look for easy-prep activities to do with my 4 year old.  Being a mom to another toddler (1.5 years) as well as being a wife of a workaholic I always struggle with finding enough time to put together activities  to practice skills that we learn everyday.  Also being the selective 4 year old that D is, sometimes activities are a hit and sometimes a miss, a wasted effort.  So I normally am very cautious when putting together activities and make sure that they can be re-used at least one more time in another way, just so I feel better! I just don't want to print, cut or laminate for it to be used only once!

As you know from my pom-pom post, we've been working on our number facts up to 10.  As I was looking through Pinterest the other day I came across this cute pumpkin activity and what a great way to practice addition facts!  The down side was that I had to get those pumpkins or some kind of container, both not in my school supply stock!  Spindle Box was one item that I did not buy and one of the earliest items that I made and we've used a variety of counters to practice counting, but it hasn't been used in a long time and was collecting dust!  So I decided to put together this activity quickly.


I already had the spindle box, so all I did was write the equation of the sums corresponding to each slot on popsicle/craft sticks.  

To help with computing until she masters the facts, I made this cool bead counter, that is similar to "10" in the RightStart Abacus.


I came across this idea here and you can even find a you tube video of the tutorial to make this cool counter there.  I used some large wooden beads and lacing string to make this.  This neat counter is the point of interest for this activity and "I" am the control of error!


This post is linked to Montessori Monday and TGIF Linky Party

Saturday, November 12, 2011

FIAR - Volume 1: Madeline

I am extremely behind on posting about the FIAR titles that we rowed!  But better late than never!

For our second row we worked with Madeline.


This is a delightful story about a little girl called Madeline what happens when she has an appendectomy.  This story led to so many interesting conversations about boarding school and why parents would do such a thing to their kids!  D still things Madeline's parents are cruel to do that!  We also had conversations about compassion and that was another idea from the book.

We located France and Paris on our world map.  D even colored a French flag.  We talked about the Eiffel Tower and worked with a $1 Eiffel Tower craft from Michaels.  The Tower was difficult to put together and collapsed with the slightest movement.  We had fun though!

We checked out "Crepes" by Suzette from our local library to go with the France theme.


What a delightful book.  We learnt a lot of French phrases and also tried Crepes with the recipe in the book.  I don't have any pictures of our Crepes, because we ate them before clicking some pictures!

Another delightful book that we read based in Paris.  This book is no longer available on Amazon, but here is a picture of the cover.  The author is Catherine Stock.


We also read "Suzette and the Puppy", a story based on a painting by Mary Cassatt.


Since "Madeline", the heroine has an appendectomy we had a lot of interesting conversations regarding taking care of our body.  We read a couple of books on the same topic.


Thursday, November 10, 2011

Our Pumpkin Unit

We've been having a blast with our pumpkins that we bought for halloween.  Here is a glimpse of what we have been doing.

We got the free pumpkin lifecycle cards from here and have been working with those 3-part cards.


We also worked with this cute poem about pumpkins.  They offer a cute printable version of the poem and we just used that.


We also examined the pumpkin when we carved our jack-o-lantern.


Here are some of the crafts that we did with the pumpkin theme.  The first one is an easy one, I let D cut orange strips out of construction paper and tear it into bits.  Then she basically glued that onto a paper plate for the pumpkin body.  She drew and then cut out shapes for the facial features from black construction paper and stuck that on.  She then punched a hole and twisted a green pipe cleaner for the stem.  Easy, no mess project.


This is another one we did with a lot of help from me.  We basically stapled strips (cut by D) of orange construction paper onto a toilet paper tube to make this.  This was a cool center piece on our dining table for a week!


I did not get the parts of the pumpkin cards, since we already did something similar when we did our apple unit.  We did look and examine the insides of the pumpkin.  We also roasted the pumpkin seeds for a delicious snack!  We bought a mini pumpkin pie from our local store to enjoy for desert on one of the days!

This post is linked to Montessori Monday.

Wednesday, November 9, 2011

I've been nominated!

Wow! I am so humbled.  A reader notified me that I've been nominated for the 2011 Homeschool Blog Awards in the New blogs category.  Thanks again.  I would be greatly honored if you vote for me!  Click below to vote, also please checkout the other cool blogs out there!

Our Continent Boxes - North America

Its been a while since I posted.  We've been busy working and progressing steadily in all areas.  I've been busy making quite a few new materials, definitely another post!  For now, I thought I would post (show off :)) the contents of our North America Continent Box.

One of the awesome ideas from the Montessori world is the Geography box.  It is the coolest too! I've been dying to make these ever since I heard about it!  In the 3-6 age range, when everything is about rich sensorial experiences, what better way to introduce Geography than immerse the children in a wide variety of cultures!  Geography boxes provide an awesome way to begin the experience.  The child gets to hold, feel, taste items from the various continents and get introduced to the various cultures.  I also love the fact that everybody's continent box will be unique.  Each box can be tailored to suit the needs of their children's interests!

Before I get into the details, I want to mention what I did for the boxes.  I wanted a sturdy but inexpensive option.  I looked and looked and finally found these awesome, good sized paper boxes at IKEA.  They had the various colors that were needed for the boxes, but they come in packs of two of the same color.  Then I would end up buying 7 of these and what do I do with the extra box?  So, I decided to get 4 packs of the white boxes and do my own decorations.

Here I present our first box, the North America box.  This is the heaviest box and the fullest.  We owned most of the items in this box the rest I got from the cultural exchange we participated in.

Here is our box.  I just pasted some orange (Montessori color for North America) paper on the front of the box and top of the lid.  I decorated it with some stickers we received as part of the cultural exchange.  I love how it turned out, simple and no sweat!


These are the flags that we own, just Canada, USA and Mexico.  I also made some cards for the flags that can be used for 3-part work, but for now we have plenty to explore in the box, so I left it out.


We have the North America Map that I got from here.  The Mexican map was from the cultural exchange.


In the box are the portraits of D and M that were made by an artist at the Pike Place Market.  We visited Seattle earlier this year and this was one of the memorable things that we did there.


Postcards that depict people, landscape, animal or artifact, that we've collected over the years from various places we visited across USA and Canada. We also received a couple from the cultural exchange.


Art by some of the artists local to the area depicting places or people.  We bought these at the places we visited.


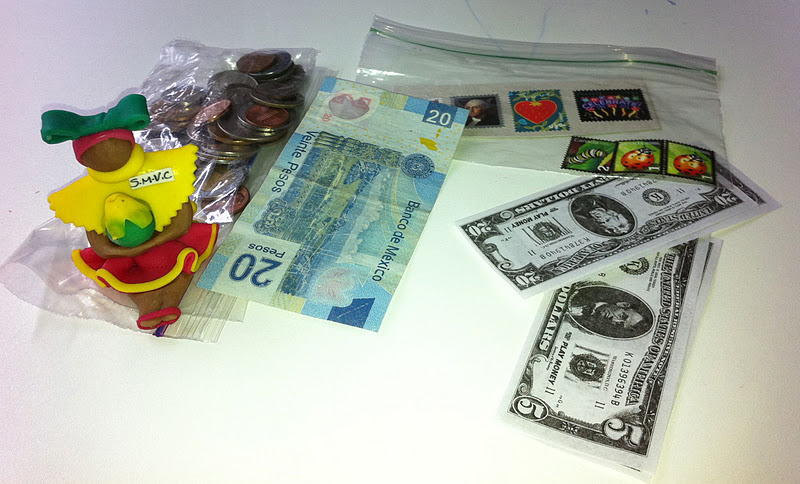
Currency, coins and stamps.  We got that little girl holding the tiny coconut at Punta Cana when we vacationed there with D.

Some items from Mexico.  We got the Mayan, the Mayan Calendar and a replica of the Chichen Itza when we visited there.  The rest are items we received from the cultural exchange we participated.


These items are Canadian, things we collected when we visited a few places there.  From left to right, Inuksuk, CN Tower that changes color, Totem Pole at Stanley Park in Vancouver.  We received the little Canada Lite flashlight from the cultural exchange.


We got this Tlingit doll when we visited Alaska.  The little leather pouch holds some Muskox fur from a farm in Alaska.


Dream Catcher and a few goodies we received from the cultural exchange.  The forget-me-not seeds are from Alaska to represent the state's flower.  We are planning to plant these next spring.


We got these little replicas of brown and black bear, the totem pole, mammoth ivory fossil and a little gold rush stone (fake!) from Alaska.


Paper dolls of Alaskan and Mexican children.  These are available at Amazon.


The US presidents and US animals flashcards, I got from the Target Dollar Spot.  The wooden US  puzzle map is from the dollar store.


Some Travel brochures and maps from the places we've visited.


Some books we own that will be used for research when D is ready to get into the details.  I got these at the various sales at our local library for really cheap.


I made a set each with pictures of the landmarks, food, houses and people (especially children) of North America.  I was sure to include, pictures of places we visited together so D can get a kick out of those! Same for food!  D loves the pictures of Starbucks coffee and pizza!  I made these pictures by getting the  images off google, will be unable to share these, sorry!


We received these Spanish flash cards, pictures from Mexico and some Spanish music (not pictured here) from the cultural exchange.


I also have the candies and food items that we received from the cultural exchange, but I've put those away for now.  We will use them later when we get into detailed studies of the continents.  Also, as you can see, I haven't included the beautiful letters we received from the cultural exchange in the box, the reason being that this box is full and already quite heavy.  When we get into studying each country I will surely pull those letters out.  

Hope you enjoyed this installment of our Continent Box!