Wednesday, August 17, 2011
Update
It has been a week since I posted! We've been doing a lot of schooling but I haven't had the time to write about our activities as I have been so busy getting our school room re-organized for the next school year. I am 90% done and will post pictures of our room in a few days. I also have a lot of stuff about the FIAR activities that we've done to be blogged. Melissa from Chasing Cheerios organized this wonderful Cultural Exchange and I have a few posts pending on both the packages that we sent as well as the stuff we've received so far! I've also been working on our Continent Boxes and they are coming along quite well, need to write about that too! As you can see, lot of things to do but very little time to do it! Soon!
Wednesday, August 10, 2011
Things that are not Montessori in our Kingdom
We've added three new items to our regular school routine and the three are not specifically montessori. I wanted something different but at the same time something really close to the montessori principles. I liked what I saw about these and here they are:


All About Spelling - Level 1
So far we love this program! We do a quick 5-10 minute lesson every other day or at least twice a week. D is breezing through the first 10 or so lessons as it is the basic pink series stuff. I love how it is hands on just like Montessori. It has blue and red letter tiles that are used to spell out words. D has such an enthusiasm for spelling words that this program is perfect to teach her the rules for spelling.
RightStart Mathematics - Level B

As much as I love Montessori Math, with a curious toddler around it is becoming increasingly difficult for us to get into the school room and get un-interrupted time to work on stuff. RightStart was developed by a Montessori Teacher and uses almost the same Montessori concrete approach to learning math. Another awesome feature that I love about this program is how the concepts are re-inforced by playing games instead of putting the child through various repetition worksheets. D definitely is not a worksheet gal. So far we are loving this and we are going very slow, every other day or just twice a week. D asks most of the times to play games and I love how she is learning!
Five in a Row- Volume 1

I first came across FIAR here. I love Laura and was intrigued, so I went on the website to find out what FIAR was all about. You basically read from a collection of carefully chosen books and you do this for five consecutive days. Each day after reading the story you can decide to do one or more activities in different subject areas. There is no set list of activities and this gives the flexibility to do all or just a few. I tried out just one story first and D was so enthusiastic about it. If you go to the FIAR forums the common practice is to create one lap book per book you read and collect all the activities you did for the week there. I like that we can look back to see how and what we did! What I most love about this program is the awesome collection of books. This has introduced us to a new wonderful set of books and has made us think about books and their contents in ways I would have never been able to do so myself. Another plus is that because of the flexibility of this program, what I do is put together some trays based on the book we are rowing and let D work at it at her pace. Once she is done, I save it for her lap book. For now our local library has almost all of the books in Volume 1 and for those that aren't available locally we use the inter-library loan feature and get at it.
Another awesome thing about doing FIAR is that we are reading so much more now that M is so interested in reading too. Anytime D and I read a book, M wants me to read her, her books! It is so cute when she gets her books and climbs onto my lap ready to read! She never did that before!
The biggest advantage to doing all three of the above is that we don't have to always get into the school room to do schooling. With M getting increasingly curious about D's work, it is very difficult for us to do schooling when she is awake. We do these on our dining table well out of reach of M. I usually give something interesting to engage M and spend the 10 - 15 mins that we get to do our stuff. I have a small area setup in the kitchen near the dining area dedicated to storing these materials. I love that I don't have to prepare stuff before hand, just need to open the manual and start our lesson! I am hoping that once M gets a little bigger and once I am able to set some rules with her, we will spend more time in the school room and get back to full fledged montessori. For now this is working for us and D seems interested and happy. We are still continuing with Montessori based stuff in other subject areas and finding time to work on these as time permits! D is only four and I love how homeschooling is giving us the flexibility to adapt our learning methodologies to our current lifestyle!
Tuesday, August 9, 2011
Ice-cream Shop - Money Practice
We quickly put together this box for Ice-cream shop play the other day. We used pom-poms for ice-cream, rainbow rice for sprinkles and red and blue stones for cherries and blueberries. We added some cups, spoons and scoops from our play kitchen. The shop was open after we created one menu each and added a cash box and money to the mix! In the drawstring back we have some coins and the little box is our cash box.

I created this menu:


D made this menu...


Her price list basically says that 2 scoops of ice-cream is 3 cents, sprinkles are 5 cents, blue berry topping - 6 cents and a cherry was 7 cents!
It was a lot of fun playing ice-cream shop and I loved sneaking in the money lesson with this! I think D loved the fact that she could add sprinkles to her ice-creams!

Sunday, August 7, 2011
Our unit on Butterfly - Part II
We loved our unit on butterfly so much that we extended that learning into play and it was all initiated by D. It was she that started off creating antennae by twisting fuzzy sticks/pipe cleaners onto her headband! We pretended searching for flowers and found one with tasty nectar!

We loved drinking the nectar using our proboscis! Yum! We danced around in celebration, flapping our butterfly wings!

Don't you love it when so much learning happens through play!
Friday, August 5, 2011
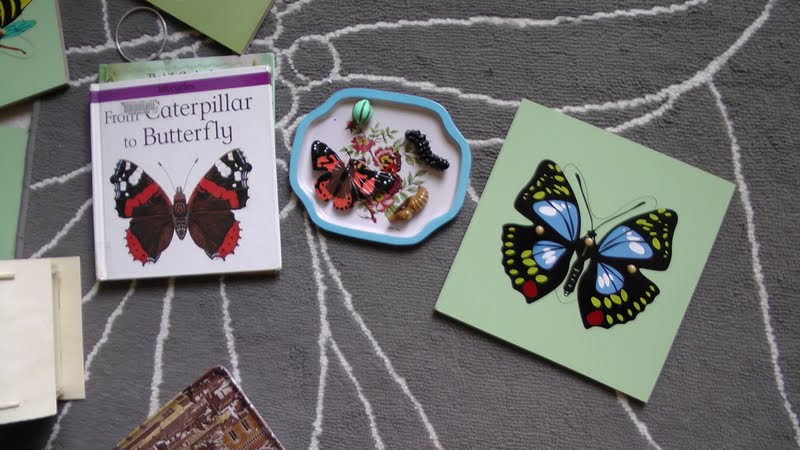
Our unit on Butterfly - Part I
We did a unit on butterfly and had so much fun in the process. With D, usually a good book from the library gets her interested in a unit. We read the two books on butterflies and their lifecycle (links below). I bought a life cycle set from amazon and used that for the concrete representation of the lifecycle stages. I did not print any life cycle cards, but instead created a file with different kinds of butterflies and went through those.

Some highlights of what we learnt:

It was extremely easy and D assembled and glued her caterpillar with very little guidance from me. Here is her finished caterpillar. Isn't he cute!

We also made some butterflies using coffee filters and wooden clothespins, but I don't have pictures for those!
We also extended this to our play and I will follow this up in another post!
Here are the links to amazon for some of the things that we used for this unit.
Some highlights of what we learnt:
- Metamorphosis of a butterfly through the life-cycle stages
- Molting of the caterpillar
- Migration of monarchs
- Hibernation
- Milkweeds
- Butterfly garden
- Different parts of a butterfly
- Differences between a butterfly and a moth
We did a simple project to create a caterpillar using pom-poms.

It was extremely easy and D assembled and glued her caterpillar with very little guidance from me. Here is her finished caterpillar. Isn't he cute!

We also made some butterflies using coffee filters and wooden clothespins, but I don't have pictures for those!
We also extended this to our play and I will follow this up in another post!
Here are the links to amazon for some of the things that we used for this unit.
Wednesday, August 3, 2011
Giveaway at Montessori Beginnings
Check out her cool Australia Continent Box and be sure to enter the giveaway!
Alphabet/Sound Box
This is another topic I loved and researched so much in the montessori blog world!


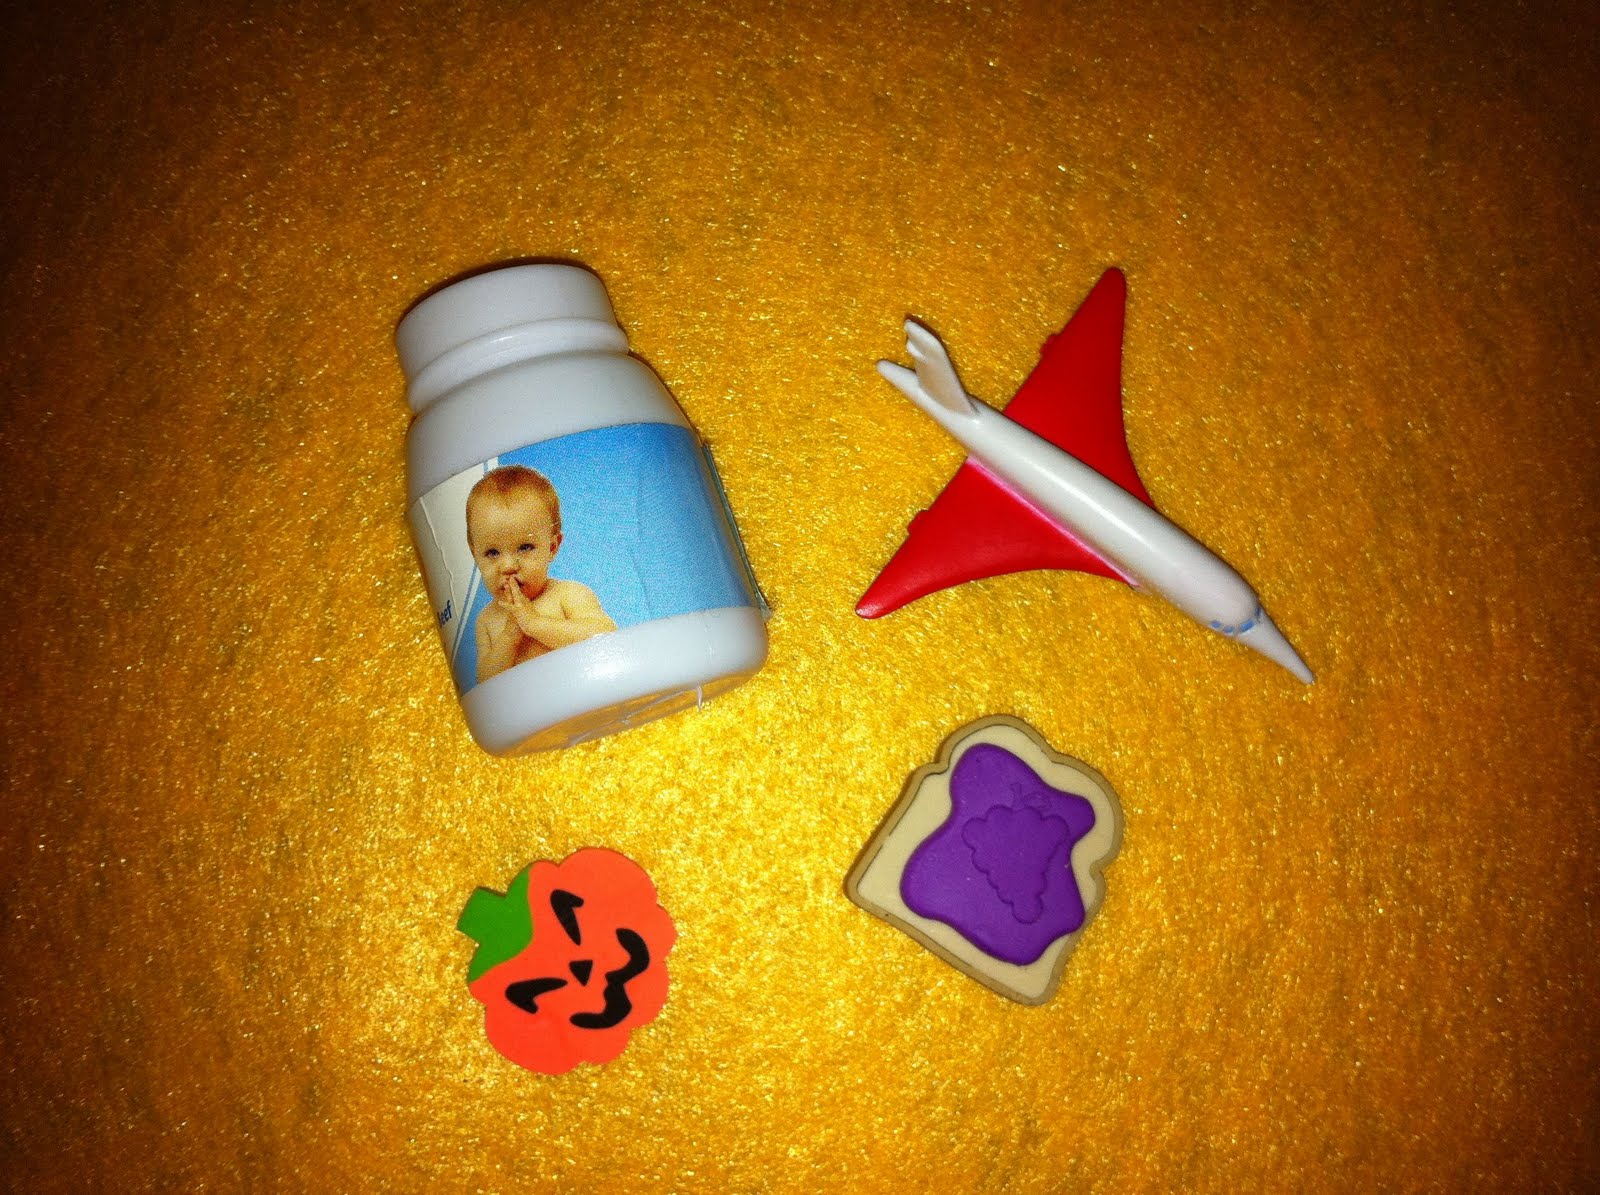
For use with the Moveable Alphabet, I just have one object box out with a few phonetically spell-able objects. Every few days I rotate the objects in that box to keep the interest alive. The other day D pulled out my "husc" box and started randomly spelling objects! These objects can be used later as Story/Creative writing prompts too.
So far we've enjoyed these boxes very much and this is a great learning tool! You can find my favorite alphabet box posts - here, here and here.
The Alphabet Box
Our collection is not just mini objects mainly because I did not want to spend money purchasing stuff. I tried to salvage what I can mostly from the kids' toys and some from around the house and I ended up with plenty for most of the alphabets. For the rest I made some.
Here are some ideas for collecting these:
1. Items in kids toys, doll house items.
2. Shapes cut out using foam or card stock.
3. Little buttons or Cute erasers (I found a few at Michaels while browsing the other day)
4. Knit tiny pieces of fruits or vegetables.
5. Make some out of air/oven dry clay and paint these.
6. Use wood to make some.
7. Sew tiny bags or clothes.
8. Safari Toobs for Animals.
9. Use pictures or clip art for some sounds.
10. Raid the tool box for screws, nuts, bolts, nails, etc.
You can always order from a store like Montessori Services or Lake Shore Learning if you don't mind the cost.
Also I did not get one of those hardware store boxes with little drawers. The main reason being some of our objects will not fit in those little drawers! I store ours in these little IKEA boxes, 6 of them to be exact.

I grouped the items together in the order I was going to introduce them. I found this order at My Montessori Journey perfect with similar sounds in different groups. These are the sets:
r a m f
b i t g
p o n l
h u s c
d e x q y
z v w j k
Here are the contents, alphabetized:


Aa - astronaut, apple, ant, alligator

Bb - bib, boat, bell, bike, ball, bat, bow, bag, bin

Cc - compact disc, can, cat, candle, clip, car

Dd - dolphin, dog, duck, dot

Ee - elephant, earth, eight, egg

Ff - fire truck, frog, fan, fork, fries, feather, fish

Gg - gorilla, glue, guitar, grapes

Hh - horse, hexagon, head phone, hedgehog, hook, hamster, hen, hippo, helicopter

Ii - ink pad, iguana, ice-cream (not to be used with the short i sound), insect, india

Jj - jar, jet, jack-o-lantern, jelly sandwich
Kk - kitten, key, kangaroo, kite

Ll - ladle, lid, lobster, lock

Mm - milk, motor cycle, mouse, marble, monkey, macaw, millipede, mic

Nn - nest, net, nail, nut, nickel, nine

Oo - ox, octagon, owl, octopus

Pp - pickup, parakeet, panda, pacifier, pom pom, puncher, plate, penny, pencil, pin

Qq - quarter, queen, question mark

Rr - rat, rubberband, rectangle, rocket, rhinoceros

Ss - strawberry, stapler, screw, spoon, spider, scissors

Tt - tiger, telescope, tweezer, turtle, triangle, toucan

Uu - umbrella, underwear

Vv - vase, valentine

Ww - walrus, whisk, wood, whistle

Xx - box (I used D's xylophone too, it was too big to fit in the box!)

Yy - yak, yellow, yarn

Zz - zebra, zero

These boxes don't have the actual alphabets in them. I used the sandpaper letters (another home made item - sandpaper glued onto card stock) with the corresponding objects while introducing the sounds. D caught on so quick that we did 4 to 5 sounds at a time and she moved onto sorting by initial sounds and ending sounds. Another popular use for these is the "I Spy" games at this stage. Please note that if you are following the Dwyer Scheme, you are NOT to introduce the written symbols before the child has clearly learned to distinguish sounds. You can use these objects to just play sound games without the written symbols.
Before I knew about the Dwyer Scheme for Reading, we did the traditional pink, blue, green series stuff. So for the pink object-word matching as well as for spelling using the moveable alphabet, I created a box with 3 letter pink objects that she could use. D was part way through the blue scheme when we switched.
For the double letter sounds, the same can be done. Here is an example of "sh"and "ch" that I had out for D.
sh - shark, shoe, sheep, shell

ch - chimpanzee, chain, chap-stick, cheerios, chalk

So far we've enjoyed these boxes very much and this is a great learning tool! You can find my favorite alphabet box posts - here, here and here.
Subscribe to:
Posts (Atom)